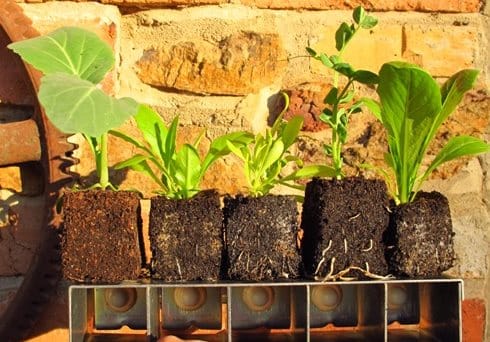
Spring is around the corner here and there’s so many food plants I’m excited to get into the garden. Because of this, I’ve been focussing a lot on seeds a lot this month.
In recent blog posts and youtube films I have been talking about using milk containers to make self-watering seed-raising pots and also explored seed-balling too.
Here’s another super way to get seeds started – soil blocks. Last week I was delighted to see them in use at a local school garden and it reminded me to give them another go for my current seed-raising blitz.
 |
| These soil blocks are made with a commercially-made soil-blocker but you can form them with your hand too, or your own DIY set up. Image source: sgaonline.org.au |
Soil blocks make growing vegetables from seeds so easy and successful. I often hear people say that they don’t bother growing from seed – because it’s too hard, too time consuming, too fiddly, they never have success and so on. I think many of us relate to this, and I have felt this way in the past too. Self-watering posts, seed balls and soil blocks just make it all so much easier.
I’m going to experiment with a few simple DIY methods of soil blocking and play with a few mixes. I’ll document my trials over the next weeks to let you know know how they go. Let us know too if you have some great ideas. Watch out for a little film about this on Our Permaculture Life youtube channel. I encourage you to subscribe so you get each weekly episode delivered to your inbox.
 |
| A dried soil block awaiting use at the school – simply sit this in a tray of water and allow to soak it up the moisture, it will be activated and be ready for seeding. |
Why grow from seed?
Really, there are just so many good reasons to grow from seed if you can, such as:
– you have access to such greater diversity of plants and varieties
– you can use your own seed saved year after year
– you know the source of your seed
– you can support the continuation of local seed varieties
– it’s much cheaper to grow from seed
Basic Soil Block Ingredients:
- 4 parts compost
- 1 part worm castings (optional) for extra nutrients
- 1 part soaked coir peat (coconut fibre) for moisture and for binding the block together
- water
Making the Soil Mix
- Mix together dry ingredients. Keep some aside if you to thicken up the mix later.
- Mix 2 parts dry mix to 1 part water.
- Try to make a consistency like sticky mud.
- Keep adding more water until you get the right feel.
Depending on the mix of ingredients, the ratio will vary – so just keep checking. It will be good when, if you squeeze a handful, a few drops of water are squeezed out. If lots of water comes out, add more dry, if no water comes out – add more water.
Making the Soil Blocks
- Make them by hand. They don’t need to be cubes – they can be 5cm balls with flat bottoms – as long as they can stand on their own. Simply make an impression in the top with your finger into the block to make a hole for the seed.
- Use a home-made blockers. You can make from a all sorts of containers such as old cans, sections of pipe, glasses….
- There are also commercially available Soil Blocking Tools
Seeding the blocks
- Place seeds in the holes.
- Keep watered – usually by flooding the tray that the blocks are sitting for a few minutes and then draining off.
These blocks give the seedlings much more space to grow and do not have their roots disturbed by being pulled part when they are transplanted. Because the seed block is bigger than the usual seed tray, they don’t dry out as much and there is more nutrients available – and therefore the seedlings are much healthier.
Easy to make, easy to sow, easy to maintain and easy to plant out. Sounds like a wonderfully simple seed raising strategy to me.
Have you tried seed blocking? What was your best mix and best method?


